The Drive on Metz was created expressly for this book. It was designed to do a number of things. First of all, it will introduce people who aren't quite sure what a wargame is to what it is all about. Second, it helps me explain to wargamers certain things about how wargames are designed and why they are often done that way. Third, the game recreates a historical event, General Patton's attempt to capture Metz in September, 1944. What follows is an item-by-item description of what a wargame is.

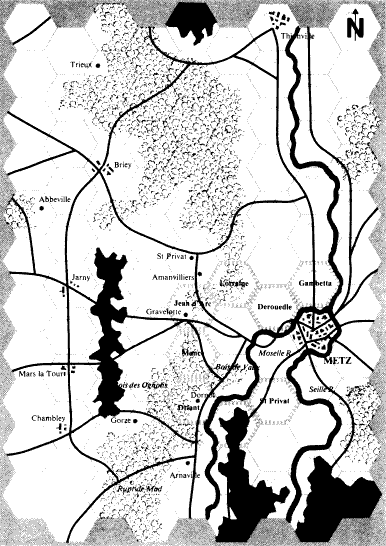
The Drive onMetz wargame map, the surface upon which you play the game.
The game rules at the end of the book describe this in more detail.
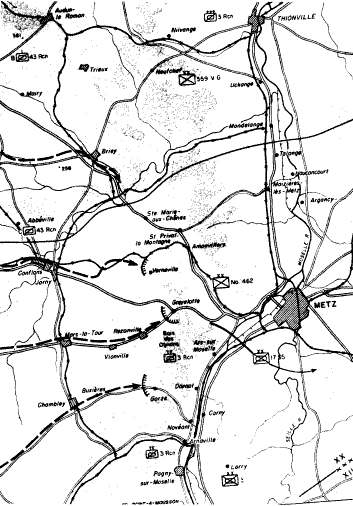
Most wargames start with a map out of a book (or a map archive or, increasingly, satellite photos).

the original map used to create the Drive on Metz wargame map.
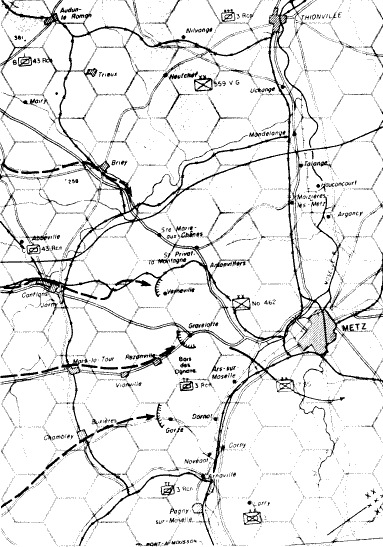
Put simply, a hexagonal grid is used to regulate movement and the position of units. Each hexagon contains a certain type of terrain, Each type of terrain has a different effect on movement and combat. The game designer analyzes the terrain in each hex and turns the original map into a wargame map.

The original source map with a hex grid superimposed over it.
Like chess pieces, the wargame playing pieces represent historical combat units and their capabilities. Wargames involve a lot more numbers, so wargame playing pieces have a lot of information on them.

These are the military units involved in the game. Normally, they would be die-cut pieces of cardboard colored green for the American units and gray-green (feldgrau) for the German units. The following section from the game rules very succinctly explains what all the symbols on the playing pieces represent.

The playing pieces represent the combat units that actually took part in the original battle. See the graphic file above for a description of the symbols found on the playing pieces.
There are usually half a dozen or more different types of colored hexes on a game map and each has a different effect on movement and combat. The Drive on Metz game shows how terrain differences can also be shown in black and white. The Terrain Effects Chart describes the effects of each type of terrain upon movement and combat. As the previous section on the playing pieces described, the number on the bottom right of the playing piece is its movement point-allowance. Each type of terrain costs the unit a different number of movement points to enter. Put simply, using this system, a unit can move much farther on one turn on the roads than it can moving through the forest. In much the same way, the effects of terrain on combat make it easier to defend in woods or towns than in the open. It's actually as simple as it looks. In the past there have actually been chess game variants that took the same approach.
TERRAIN EFFECTS CHART
| Terrain | Example Hex Number | Effect on movement [MP's to enter] | Effect on combat [Leftward column-shifts on CRT] |
| Clear | 0406 | 2 | None |
| Forest | 0404 | 4 | 2 |
| Rough | 0306 | 3 | 1 |
| Town | 0206 | Same as other terrain in hex | 2 |
| Fortified | 0507 | Same as other terrain in hex | 3 |
| Road | 0405 | 1 | None |
| River | 0804 | Must be adjacent at start of movement, uses all MP's to cross | 3 [Only if all attackers are attacking across] |
The Combat Results Table (CRT) handles the combat strength differences of units. The CRT also provides for the luck factor so prominent in combat. The phrase "fortunes of war" was invented by soldiers, not poets. Resolving combat is straightforward. When a friendly unit moves next to (adjacent) an enemy unit, it may attack that enemy unit. Success in combat is dependent on two things. First is the combat value ratio of the attacker and the defender. The greater the advantage the attacker has in combat value, the greater his chances of being successful.
COMBAT RESULTS TABLE
| Die Roll | Differential [attacker's strength minus defender's strength] |
| -1+ | 0 | +1 | +2,+3 | +4,+5 | +6,+7 | +8,+9 | +10+ | |
| 1 | - | DR | DR | DR | DR2 | DR2 | DR2 | DR2 |
| 2 | - | - | DR | DR | DR | DR2 | DR2 | DR2 |
| 3 | AR | - | - | DR | DR | DR | DR2 | DR2 |
| 4 | AR | AR | AR | - | DR | DR | DR | DR2 |
| 5 | AR | AR | AR | AR | - | DR | DR | DR |
| 6 | AR | AR | AR | AR | AR | - | DR | DR |
-: No result, DR: defender retreat one hex, AR: attacker retreat one hex, DR2: defender retreat two hexes.
Don't underestimate the element of chance. Not just in warfare, but in most human endeavors, no matter how well we set things up, there's always that strong element of something just going wrong. This is why the Combat Results Table is a probability table. But again, the chances of success increase as the attacker's preponderance of force over the defender increases. In this way you can make, or at least increase, your "luck."
Basically. that's it. Let's go through a few turns of this typical wargame to see how it works in reality. In true wargamer fashion, I played this out by myself, alternately taking each sides situation and making the most of it. I recorded the moves as I went along.
While we are doing this, let me demonstrate how the wargame connects with history. Most of you have read accounts of battles, and they often become quite confusing, even with the assistance of detailed maps. A history book account of the actions that I played out has been interspersed with the description of what was going on in the game. The "historical" version is in italics.
In the following series of illustrations, we will play out two complete turns of Drive on Metz, interspersing the game description with equivalent text you would find in a historical account of the battle. Observe these turns carefully, and you will have a sound knowledge of how most wargames work. Comparing the game depiction of the battle with the written one demonstrates why games are considered such a powerful (and entertaining) teaching tool. Remember that each hexagon represents four kilometers from side to side (about 2.5 miles) and each turn represents one day.
![]() Wargame Test
Drive : Turn 1: U.S. Movement Phase
Wargame Test
Drive : Turn 1: U.S. Movement Phase