On the 7th of September, Patton's Third Army began its advance into the Metz area. After the breakneck pursuit of the defeated German armies through France during August, the German border was reached. The allied units were exhausted and their supplies of fuel and ammunition could not keep up with the troops. As the Germans reached their own border, they were greeted with reinforcements, and fortifications to defend from. Patton's force assigned to seize Metz before the Germans could get organized was the 20th Corps, which consisted of three divisions. From north to south they were; the 90th infantry, the 7th Armored and 5th Infantry.
The advance was on a broad (45 km) front. In the north, the US 90th Infantry divisions 357th infantry regiment advanced on Trieux (31 km northwest of Metz) while the 90th's 358th infantry regiment advanced on Briey (23 km northwest of Metz)
The units of the 7th Armored division and the 5th Infantry division were intermixed. From north to south these infantry regiments and armored combat commands were; combat command A advanced on St Privat (12 km northwest of Metz), the 5th and 10th infantry regiments advanced on Gravelot (4 km south of St Privat), combat command R advanced 5 km south of Gravelot, the 11th infantry and combat command B advanced on Arnaville (17 km southwest of Metz).
Opposing the two 90th infantry division regiments was the German 559th infantry division (two weak regiments, the 1125th and 1126th). Manning the rest of the front (inside the extensive fortifications of Metz) were (from north to south) the German 462nd infantry division (the under strength 1010th infantry regiment and the ad hoc officer school, or Fahnenjunker, regiment) and the weak 8th PanzerGrenadier regiment of the 3rd PanzerGrenadier division. Just to the south of the fortifications ringing Metz was the 29th PanzerGrenadier regiment of the 3rd PanzerGrenadier division. Behind the front line German units was the 17th SS division (37th and 38th SS infantry regiments) and the weak regimental strength Metz garrison.
Turn 1: American Player Movement Phase
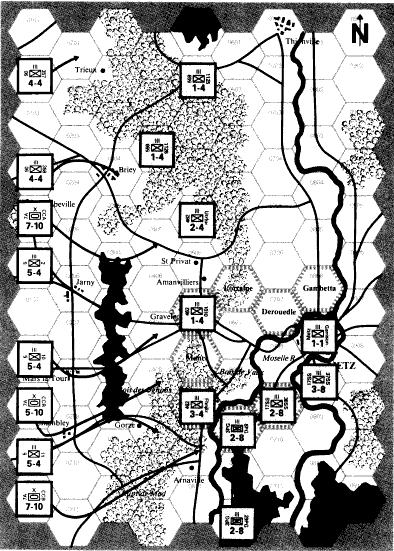
On Turn one, at the beginning of the game, the German units are set up on the map as shown. This is how they were actually deployed on September 7, 1944.
The American player decides to make a push in the south. Accordingly, units are moved as follows (from north to south):
The 357th regiment enters the map on hex 0102 and moves into hex 0201. This takes a total of four movement points, which is all this unit has. The 357th regiment will, during the next turn, proceed to move into the forest, in the direction of Thionville. Because it takes four movement points to enter a forest hex, it will be a slow process, but this will ultimately force the Germans back by threatening to cut off German units in the northern portion of the map. This is a classic battlefield maneuver know as "working around the enemy flanks."
The US 358th regiment now moves to hex 0104, goes to 0203 and stops in 0304, adjacent to the German 1126th regiment. This movement took only three movement points, as the unit was moving on roads all the time. This points out how important roads are in warfare. Even the ancient Romans built roads (some which are still in use) to speed up the movement of their military units.
The American combat command A enters the map on hex 0105. This is a road hex, so it takes only one movement point. combat command A then goes off the road to hex 0205, 0306, and stops in 0405, expending a total of eight movement points because it was going cross country most of the time. combat command A is now adjacent to the German Unterfuhrer regiment in hex 0505.
The U.S. 2nd regiment enters on hex 0106, goes to hex 0206 and stops in 0307. It advances no farther, even though it could, because it wants to allow the U.S. 10th regiment, which will enter on 0108, to proceed up the road and stop in front of the German 1010th regiment in hex 0507. This shows how the simple game mechanics can recreate the very real problem of traffic congestion in combat maneuvers.
The U.S. 10th regiment, avoiding the potential traffic jam, enters on 0108, going into 0208, 0308 and stopping in 0407, having expended all four of its movement points by moving on the road at the rate of one point per hex. The US 10th regiment has now positioned itself in front of a weaker German 1010th regiment in 0507 in preparation for an attack.
Combat Command R enters on hex 0110, proceeds to 0209, 0309 and stops on 0408, adjacent to the German Fahnenjunker regiment (in hex 0509.) combat command R expended seven movement points doing so.
The U.S. 11th regiment which also enters on the road at hex 0110, proceeds to hex 0209, 0309 and stops on 0409, also adjacent to the German Fahnenjunker regiment.
The U.S. combat command B, enters on hex 0111, goes to hex 0211 and then proceeds on the road to hex 0311, 0410 and 0510, expending seven movement points, and ending up adjacent to the German Fahnenjunker and 8th Panzer-grenadier regiment. The last three US units are now in a position to attack the German Fahnenjunker regiment.
All German units that the Americans have moved adjacent to are going to be attacked.
Now the actual battles take place. First we get the story as a conventional history would describe it.
![]() Wargame Test
Drive : Turn 1: U.S. Combat Phase
Wargame Test
Drive : Turn 1: U.S. Combat Phase